This file contains tips and suggestions that might prove useful.
Nucleus creates archives dynamically on users requests. The URL is then of the form index.php?archive=2001-09&blogid=1. Unfortunately, Google and other search engines don't like to index pages with a question mark in it, or with too much arguments. This is because their spiders might get trapped going too deep.
Two solutions are listed below. They're not guaranteed to work, however (wether they work or not depends on the webserver configuration)
Nucleus v2.0 has a new option in the global settings 'URL mode'. Setting it to 'Fancy URL' mode, and performing the steps below, will make your URLs look like http://example.org/item/1234 instead of http://example.org/index.php?itemid=1234. Search engines like these URLs better.
Installation steps:
/extra/fancyurls directory (except for index.html) to your main nucleus dir (that's where your index.php and action.php file are).htaccess file (most ftp-programs don't show hidden files by default, so don't start uploading it without checking your server). If you do, download that old one first, and copy the contents of the new .htaccess file (from the fancyurls folder) in your old one, and upload that...fancyurls.config.php file so that $CONF['Self'] points to your main directory. $CONF['Self'] variable in your index.php, if you don't want to end up with index.php/item/1234 urls when people come via that wayWhen it doesn't work (e.g. you receive an Internal Server Error): bad luck... Remove the files again (don't forget the hidden file .htaccess) and reset the Fancy URLs setting in the admin area.
This second possible solution will only work on servers running Apache, and when you have the right to do so. What we will do is 'disguise' the archives as regular HTML pages
Create a file called .htaccess (leading dot!) with the following contents:
RewriteEngine On
RewriteRule ^archive-([0-9]+)-([0-9]+)-([0-9]+).html+ index.php?archive=$2-$3&blogid=$1
RewriteRule ^item-([0-9]+).html+ index.php?itemid=$1
RewriteRule ^archivelist-([a-z]+).html+ index.php?archivelist=$1
Now upload this file to the directory that contains index.php and config.php. Open your browser and try to open archive-1-2001-09.html. If it works, continue to read. If you get a 500 error (internal server error), it does not work on your server, so delete the .htaccess file.
Now all you have to do is to update the link to your blog archives into archivelist-shortblogname.html and make the following changes to your archivelist item template:
<a href="archive-<%blogid%>-<%year%>-<%month%>.html">...</a>
And now, wait until Google comes spidering again...
Nucleus CMS version 3.3 offers an easier way to enable the basic Fancy URLs. There are only three steps necessary to install this solution:
.htaccess file from extra/fancyurl-2 to the root directory of your Nucleus CMS installation.index.php file which you can find in your root directory. Change value of the CONF['Self'] from the default value ('index.php') to the URL that points to your root directory, for example:CONF['Self'] = 'http://yourdomain.com/yourNucleusDirectory';Don't use a slash at the end.
Everything done.
If you want to use rewritten URLs like item/this-is-a-title you can find plugin solutions for it in the Nucleus Plugin Wiki, for example NP_FancierURL2.
To enable some features of Nucleus, changing file permissions is required. A small guide on how to do this using an FTP client is given below.
First of all, you'll need an FTP client that supports file permission changing. In this example, we'll use CuteFTP. You can download a free trial version if you don't have it.
To change the permissions of a file or directory, create an FTP connection to your website and search for that file or directory in the hierarchy. Select the file by clicking on it.
Open the menu Commands > File Actions > CHMOD... for a file, or Commands > Directory > CHMOD... for a directory.
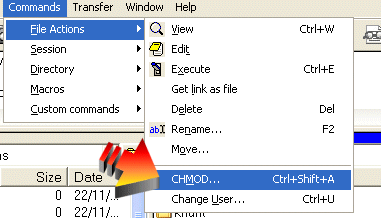
A window will pop up:

On the bottom, you can enter the code that's given in the documentation (e.g. 755 or 444). Click the OK button and the changes will be applied. You're finished now.
Nucleus has a backup/restore option that super-admins can use to create a backup of the database. It's strongly encouraged to take a backup regularly (weekly or so). The backup-files that are returned are files containing standard SQL-queries, that reconstruct the state of the database as it was when the backup was created.
While backing up is easy, and restoring should also be easy, problems might pop up when your database is fucked up beyond repair. In that case, the repair function might become unaccessible. Below are some ways you can restore your database in that case:
If you have a web-based interface through which you can manage your database (e.g. PHPMyAdmin), there's most likely an option where you can import a file into the database. Use this function to restore your database.
If you have a shell account, restoring a backup can be done by running the mysql program with the following arguments:
mysql -u username -p -h hostname databasename < backupfile.sql
As a superadmin, you can create new weblogs from the 'Nucleus Management' screen. They will then show up on the admin area.
There are several ways in which you can make your new weblog accessible.
blogid attribute in the URL:
http://yourhost.com/index.php?blogid=2index.php file (in this example, our file is named copy.php), and editing the contents of the file to look like this:
$CONF['Self'] = 'copy.php';
include('./config.php');
selectBlog('shortblogname');
selector();

?>The selectBlog is only one of the methods which you can use in copies of index.php files. Here's a list of the available calls:
| Method | Description |
|---|---|
selectBlog('shortblogname'); |
Makes sure a certain blog gets selected |
selectSkin('skinname'); |
Makes sure a certain skin gets selected |
selectCategory(1234); |
Makes sure a certain category gets selected. Takes a category id as argument. Also accepts a category name (keep in mind that this can cause problems if multiple categories have the same name) |
selectItem(1234); |
Makes sure a certain item gets selected |
selectLanguage('french'); |
Makes sure a certain language gets used (note: might produce PHP warnings) |
Make sure that these methods are called after the include('./config.php') statement, and before the selector(); statement!
The process for creating a blog in a subdirectory (http://yourhost.com/sub/ where the main weblog is in http://yourhost.com/) is similar, with the only change that you'll need to replace include('./config.php'); by include('../config.php');
If you see tags like <br /> in the source code of your webpage, it's because the output of Nucleus (except the things defined by templates and skins, of course) is compliant to the XHTML 1.0 standard from the W3C, which is the successor of HTML 4. This way, Nucleus is ready for the future of the web. As far as I know, this XHTML support does not cause any trouble with older browsers and is correctly interpreted.
What this means, is that you can perfectly create an XHTML-compliant site by using correct skins and templates. The default Nucleus skin is XHTML-compliant, but uses the "HTML 4 Loose" doctype. This way, users not knowing XHTML can not create documents with a false XHTML doctype.
1. Enter the Nucleus admin area and go to Skins management page (Layout>Skins). Find your skin and click the Edit link in the right column.
2. Under the list of skin parts there is a sections called Special skin parts. In the field type the name of your special skin part and then click the Create button. (I'm using the name 'About' for my example). You then get a Edit skin part form, just like for any other skin part, that you can add content, skin variables or anything else. If you want to make it look like the rest of your site, you can copy the contents of the Main Index skinpart here and replace the <%body(...)%> skin variable with the contents of the static page.
For example, using the default skin, the contents of the About skin part would look something like this:
<%parsedinclude(head.inc)%>

<!-- page header -->
<%parsedinclude(header.inc)%>

<!-- page content -->
<div id="container">
<div class="content">
This site is run by a group of friends who all enjoy hiking. Together we have
hiked a total of over 4000 miles though out the US, Canada and Europe. Here we
share our experiences and our experience. Though we are serious hikers, we
believe hiking should first be fun for everybody.
<br /><br />
To join our community, please register here: (...link to registration page...)
<br /><br />
... insert links to images of hiking fun...
</div>
</div>

<!-- page menu -->
<h2 class="hidden">Sidebar</h2>
<div id="sidebarcontainer">
<%parsedinclude(sidebar.inc)%>
</div>

<!-- page footer -->
<%parsedinclude(footer.inc)%>
3. Now to access this page, you would point your browser (or put a link in your skin somewhere) to
www.yourdomain.tld/index.php?special=About4. You can edit this skin part just as you would any other skin part and most skin variables and plugins will probably work.
Note: You may want to keep your static content in a file called About.html in the skins/default/ directory (if using the default skin) and instead of typing the content of the page in the skin part, just put <%include(About.html)%>. There's almost no restriction on what these pages can contain.
(Tip from ftruscot)